This post is part of my MB2-714 exam series of articles and contains my notes relating to entitlement management in CRM 2016.
This post covers the following required areas –
- Create and maintain entitlement templates
- create a new entitlement
- add entitlement lines
- associate products
- associate entitlement channels
- associate an SLA
- activate an entitlement
- renew an entitlement
Create and maintain entitlement templates
A new entitlement template can be created by navigating to Settings > Service Management then selecting Entitlement Templates in the Templates section.

By default, there are no entitlement templates, it is good practice to create templates as required so that all entitlements follow a similar standard.
There is only a single required field when creating an entitlement template which is the “Entitlement Template Name” field however there are several fields which are important –
- Restrict based on entitlement terms – toggles whether the entitlement will stop creation of new cases if the accounts entitlement has run out.
- Allocation Type – Determines whether the entitlement is based on “Number of cases” or “Number of Hours”
- Decrease Remaining On – Determines whether the remaining entitlement is removed based on “Case Resolution” or “Case Creation”. If Allocation Type is “Number of Hours” then the choice is locked to “Case Resolution”.
- Total Terms – Determines the total allocation based on number of hours or number of cases.
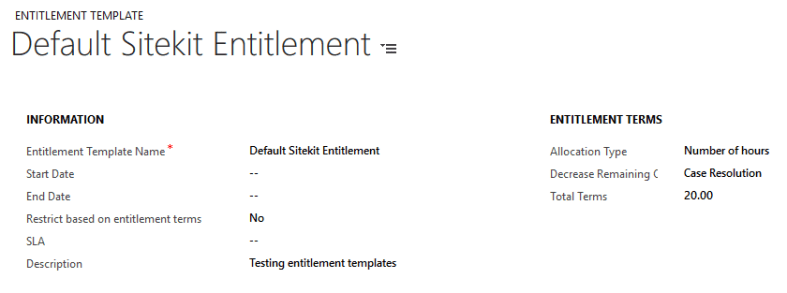
A default Start Date and End Date can also be defined however there are few cases this would be relevant unless a large number of entitlements must be created for the same time period.
Entitlement terms can be further refined using Entitlement Channels & Products. These would be useful to define if there should be different templates for specific products or if there are separate entitlements for certain channels such as Twitter messages.
Once an Entitlement Template is defined it can be selected when creating a new entitlement.

Create a new entitlement
Entitlements are created and maintained in Settings > Service Management.
An entitlement may be created in three ways –
- Selecting ‘New’ and creating an entitlement from scratch.
- Selecting ‘New from Template’ and creating the entitlement based on a predefined template.
- Renewing an existing cancelled or expired entitlement.
There are several required fields when creating or renewing an entitlement –
- Name – internal name
- Primary Customer – Lookup of an account or contact
- Start Date & End Date – constrains the entitlement between certain dates
- Restrict Based on entitlement terms – Optionally restricts new cases being created if there is no entitlement left
- Owner – defaults to current user
- Is Default – determines whether the current entitlement is the default for the primary customer
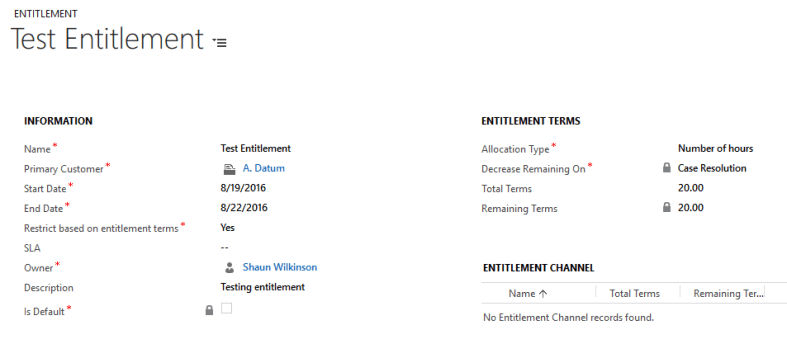
Entitlements may also be restricted to certain contacts which very helpfully defaults to only showing contacts within the Primary Customers account. This is useful in the case where you may have an agreed ‘support contact’.
Entitlements start in the ‘Draft’ state and must be ‘approved’ before they can be used or set as the default. This is done by selecting Activate in the command bar.
When an Entitlement is in the Approved state no fields can be modified however it does allow you to set the entitlement as the default for the customer by selecting ‘Set as Default’ in the command bar.
Add entitlement lines
Entitlement Lines are used to optionally restrict the amount of support a customer can use depending on where the support request came from or to restrict the ability to create a case at all. For example, limiting the number of hours of support over the phone or limiting support based on which product the customer has or limiting case creation to a few named contacts in an account.

The three Entitlement Lines are as follows –
- Entitlement Channels – The method by which the case was created.
- Products – The product related to the case.
- Contacts – The customer that raised the case.
Associate products
Entitlements can also be restricted based on products which is of use if for example a customer owned multiple products each with different support entitlements.
Associate Entitlement Channels
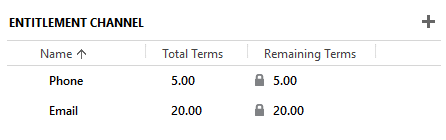
By default, the entitlement channels are as follows –
- Phone
- Web
It is possible for the Total Terms available on the channels to be larger than the Total Terms of the entitlement. For example, let’s say the total entitlement is 20 hours, the customer can be limited to 5 hours of phone support but they may also be able to raise 20 hours’ worth of email support. The total is still the 20 hours defined in the entitlement and no matter what values are put on the channels this is the hard limit.
The purpose behind this is to drive customers towards a particular channel or away from a particular channel in some cases. In this example it can be very costly to have a dedicated phone support team so it may be desirable to have the customer weighed towards the email channel.
Associate an SLA
This is covered in detail at Neil Parkhursts’ blog which seems to be the best resource on SLA’s in relation to Cases and entitlements. – https://neilparkhurst.com/2015/12/03/enhanced-sla-and-entitlements-part-one/
Activate an entitlement
Entitlements can be activated once all required fields are filled in and will go to an “Active” state providing the current day is between the defined Start Date and End Date. If this isn’t the case, then the Entitlement will be set to Waiting status.
Interestingly if an Entitlement which was already active is deactivated and the start date moved to some future date activating the entitlement will set it to active rather than waiting which may be a bug.
Renew an entitlement
Cancelled or expired entitlements can be renewed by selecting Renew in the command bar.
Renewing an entitlement creates a duplicate of the original whilst updating the Start Date and End Date fields to be current. This has the benefit of saving time and making sure that unless the entitlement should have changed it will be correct.
Entitlement Life Cycle
- Entitlements start in ‘Draft’ status.
- Entitlements are then activated and set to ‘Waiting’ status until the start date is reached.
- Entitlements are then set to ‘Active’ state.
- Once the end date is reached entitlements are then set to ‘expirer status’
- Entitlements may also be set to ‘Cancelled’ which stops the entitlement from being selected for use, a cancelled entitlement may still be used as a base to renew.
