I recently had the fortune of QIPoints founder coming across my blog and commenting that his company offered a piece of software called the “SharePoint Essential Toolkit Broken Link Manager” which is an enterprise equivalent to Microsoft’s own free tool “Search Engine Optimization Toolkit” which I’ve covered before.
Although the plan originally was to review the trial version which as far as I could tell came with a few limitations based on the quantity of documents and sites searched, I was very kindly offered an enterprise copy to give an accurate review of the software’s features and with their new 2016 edition out I couldn’t pass up the chance.
This post will be both a quick review of the newest version for those of you looking for that and also a basic guide to using the software for those of you who have already purchased this product if there is anything I don’t cover in this post that you would be interested to see don’t hesitate to comment below.

SharePoint Link Checker home screen
Overview
If Microsoft is to be believed, SharePoint is one of their fastest growing products used by tens of thousands of companies around the world, however as with the majority of this type of software, it is prone to broken links, whether they are in old documents that haven’t been updated in some time, or broken references to images of files or even locations.
This can be a serious headache not just for system administrators, but for users too. This is a problem I’ve had to tackle often due to users reporting “missing files” or “broken sites” among other things and although Microsoft’s own free tool is good, it’s just not powerful enough in an enterprise setting where the bulk of broken links can be located in documents where the free offerings can’t see them. This is where QIPoints excellent “Broken Link Checker” comes in.
Software Description
QIPoint describes their product as “a simple, yet powerful application that will help users find & fix those annoying broken links! Simply enter the Site URL and click scan, it will build a report on broken links in your sites.” and they seem to be right. I personally found the software easy to figure out and to use and I’m not the type to go diving into a technical manual unless absolutely required.
The software is capable of searching all major file types I tested and almost all areas of SharePoint from what I’ve been able to see and does so quickly compared to other solutions out there.
Feature List
This is taken directly from QIPoints link manager homepage.
- No server-side installation
- Scan site pages, web parts, master pages, navigation links, css, javascript, list item metadata…
- Supports scanning within file contents such as PDF, Text, HTML, MS Word, MS Excel, etc..
- Export report to SharePoint List, MS Excel, CSV, Essentials Lite Client (ClickOnce) Application [NEW!]
- Automatically Email Reports with a Built-In Scheduler
- Automatic Find & Replace
- Find & Replace supports Exact/Absolute URLs, Relative URLs, and wildcard/partial string replacements
- Inclusion & Exclusion Rules to fully customize what gets scanned
- Enhanced Caching of URLs to improve performance
- Customize Timeout Values
- Built-In mechanism for Site Owners to import user-defined list of URLs to fix/replace
Running a broken link search
The steps to run a broken link search are pretty straightforward, as an example I will be running a search on a site and all of its subsites.
Adding a new site
- Select “Add Site” found in the left-hand navigation.

- A window will appear, enter the URL for your SharePoint deployment, making sure to include ‘http’ or ‘https’, then select the authentication type and enter your login details if required.

- Select Add and the broken link manager will now add the site collection and all subsites to your environment list as shown below.

- Right-click on the site you plan to run a broken link report on then select ‘Create Reports’ followed by ‘Broken Link Report’.

- A new page should have opened now where you can give the report a ‘Job Name’, change the site to scan and verify your login credentials. There are also a lot of useful options which I’ll cover briefly below.
- Scan Options – Options covering what type of records will be searched, including SP lists, Page Libraries, Document Libraries and System lists. You can also enable Document Scanning here and an option to only show broken links in the final report which I’ve checked for demonstration purposes.
- File Extensions – Two fields containing the option to extend what file types the scanner will report on.
- Inclusion Rules – Allows you to limit which areas to report on within a site. There is also the option to limit the report to items that have been modified within a certain time frame.
- Exclusion Rules – Allows you to exclude certain records based on URL, items within a certain list or entire domains.
- Find/Replace – Allows you to specify rules to automatically fix broken links, this works with SharePoint Versioning on documents and also allows you to specify what type of Check in to perform if required.
- Email – Allows you to specify what email addresses the report will be sent to, the format of the report (.xlsx, .qpcx or .csv). Also allows you to specify a view to use.
- Export Options – Used to specify the file type of the exported report.
- Once you’ve changed the settings to your liking, you then have the option to save the settings as a template using ‘Save Job’ or you can schedule the job for another time or simply run the report by clicking ‘Scan Now’.
- Once the report is running you will see a live table showing what the tool is currently looking at and whether it has found any issues, when a broken link is found the row will be highlighted in Blue as I’ve shown below.

- When the report has finished the tool will notify you and create a summary of its findings as I’ve shown below

- From here you can either click Export Logs which by default exports an Excel file or you can click Open Report to see the full report which can be grouped based on the type of broken link or any other column.
Understanding a broken link report
The broken link manager doesn’t skimp on the details in its reports and certainly can be a little overwhelming if you’re not used to it. However I can see they have taken on board suggestions from users and included two very useful views titled “Broken Links” and “Broken Links by Document” which limit the report to only broken links.
I’ll cover how to access these reports and to filter as requested below.
Accessing a report
- Right-click the site which you want to access the report of.
- Expand “View Reports” then expand “Broken Link Report”.
- Select the report you want to view.
Once the report has opened you can sort or group based on the columns by either right-clicking to see a context menu where multiple actions can be taken (shown below) or dragging a column to the section above the report that shows “Drag a column header here to group by that column”.
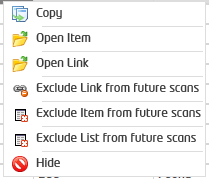
I personally use ‘Open Item’ to verify where the broken link is located in a document followed by ‘Open Link’ to verify the link is in fact broken, however this is largely unnecessary unless the data is very sensitive as I’m yet to see a false positive.
Filtering, Grouping and Changing the view
It is also possible to change the view using the View field located above the report, as a start I would suggest most people change to either the ‘Broken Links’ view to get to the data that’s most important to the majority of us or the ‘Broken Links by Document’ view to group results by the library then subgroup by document as I’ve shown below.

Conclusion
Overall I would definitely suggest this software over similar offerings I’ve come across simply due to its relative ease of use, it’s functionality and especially its ability to search within all the major document types we use on a daily basis. I’m currently planning on using this to improve the usability of our deployment by automatically fixing broken links found within our important documents and even with the slightly pricey cost involved it will be offset simply due to the time we’ll be saving.
Hopefully this post will prove of use to you all and if there is anything I haven’t covered that you would like to see I would be happy to do more in-depth how-to’s on some of this software’s useful features. Don’t forget to check out QIPoints broken link manager page for release notes, a video guide which covers the software in-depth and other useful information.
09/10/16 Removed references to QIPoints founder due to spam and corrected the name of QIPoint throughout the article

Thanks for the excellent article
LikeLike
Thanks, it is quite informative
LikeLike
I spent a lot of time to locate something such as this
LikeLike