I thought this would be a straightforward request to deal with – “We need to hide Sales, Marketing and Settings for some users”. But when you actually start to get into it you’ll quickly realise that at least the Sales and Marketing groups both contain ‘Contacts’ as well as a few other shared entities which means you can’t just hide it by not allowing access to the entities shown in the grouping.
The solution is to use XrmToolBox which I’ve briefly covered in an article before – Useful CRM 2013 Tools – and specifically the SiteMap Editor Plugin which will allow us to set custom permission requirements to view the links within the navigation groups and hide them easily.
Hiding the Groups
To hide the groups we’ll add a permission requirement to the links under the groups we want to hide, once all the links in the groups are hidden the group itself will also be hidden.
- The first step is to find a specific entity permission that the users you want to hide the group from don’t have but your other users do. In my case I’ll be using an entity called ‘showExtendedNavigation’ which is just a custom entity I have created for this purpose. All of my security groups apart from the one assigned to the specific users will have create permission on this entity.
- Once you’ve found a permission to use, open XrmToolbox and the SiteMap Editor Plugin and connect to your Dynamics instance.
- Click ‘Load SiteMap’ and wait for it to load the list.
- In my case I’ll hide the ‘Sales’ area which looks like the image below in my deployment –
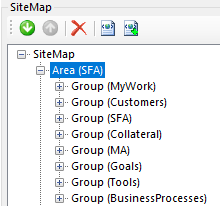
- The users that won’t be able to see this section can currently see the following groups and entities in the Sales section –
- My Work
- Dashboards
- What’s New
- Activites
- Customers
- Accounts
- Contacts
- Tools
- Calendar
- My Work
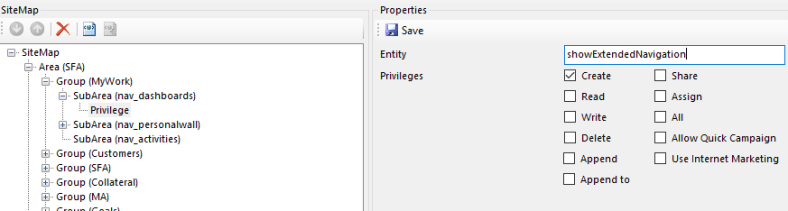
- To hide this section you will need to expand the ‘MyWork’ group in XrmToolbox which then displays the SubAreas.
- On each of the 3 SubAreas, right-click and select ‘Add Privilege’.
- Click the new ‘Privilege’ record and the Properties window should appear on the right. In my case I will add ‘showExtendedNavigation’ as the entity and check the ‘Create’ privilege.
- Once you’ve done this on all the sections you need to hide, click ‘Update SiteMap’.
- If you’ve done it correctly you should see the sections you applied the permissions to disappear from the navigation on refresh.
- Repeat these steps for all individual entities you want to hide, once all entities within a group are hidden the group itself will disappear.
