This article will cover segregating projects by status so that it is easy to only see active projects or completed projects etc, although I will cover creating fields and views which will be useful to some. I would like to thank Andre’s Microsoft ECM Blog and specifically, the ‘Archiving completed projects in Project Server 2010 or 2013’ post which covered these steps.
If you’ve found this article then you will likely need to follow the first three sections below to get everything set up as required. Once that’s done though you may use the last section – “Archiving Projects” to archive future projects.
Create a ‘Project Status’ Field
We’ll first create a new lookup table and a lookup field which references it, this will then be attached to the projects entity and will provide the basis for filtering projects in the future.
- Navigate to ‘PWA Settings’.
- Select ‘Enterprise Custom Fields and Lookup Tables’ under the Enterprise Data heading.
- Click ‘New Lookup Table’ in the ‘Lookup Tables for Custom Fields’ table.
- Name the lookup table “Status”.
- Keep everything else default and scroll down to ‘Lookup Table’, we want to create the following values –
- Registered
- In Progress
- Completed

- Click Save and then select ‘New Field’ in the ‘Enterprise Custom Fields’ table at the top of the page.
- Name the field “Project Status”.
- Make sure the Entity is set to ‘Project’ and set the Custom Attributes to ‘Lookup Table’ and select the ‘Status’ lookup table you created earlier.
- It would be best to also check ‘Choose a value to use as a default when adding new items’ and select the ‘Registered’ value.
- Check ‘Allow editing on Project Details pages for SharePoint Tasks List Projects’ and ‘Require that this field has information’.
- Click save again.
You’ve now got a field which will be editable on all projects and which by default is set to ‘Registered’ when a new project is created. The next step is to populate this field on all existing projects.
Populating the Status field of Existing Projects
- Navigate to the Project Center – Normally located at *sharepoint-Url*/PWA/Projects.aspx
- Click the name of each individual project, edit the project and set the value of the ‘Project Status’ field as applicable, make sure all projects have a value.
Creating the Required Views
Now we’ll create some views so that we can easily filter out completed projects or show only them as needed. First, we’ll create an ‘All Projects’ view which will show all projects minus the completed projects and then we’ll create a ‘Completed Projects’ view which will only show completed projects.
All Projects View
- Go to PWA settings.
- Select ‘Manage Views’ and then click ‘New View’
- Change the View Type to ‘Project Center’.
- Modify the columns etc to display as you wish.
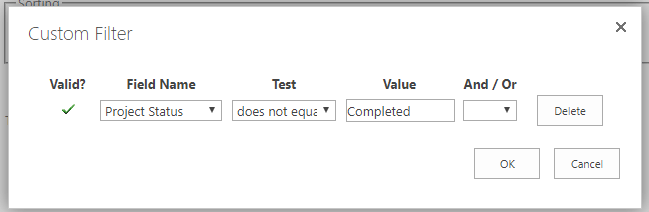
- Click ‘Filter…’ in the ‘Filter’ section and then set up the filter as in the image below. You must make sure the Value is identical to the value you chose for the completed project status.
Completed Projects View
- Do the same as above, changing the view name and the filter to be ‘Project Status – equals – Completed’.
Now when you go to the Project Center you will be able to change the view to only show in progress or completed projects easily.
Archiving Projects
Navigate to the Schedule page for a project you want to archive and open the Schedule in the Project desktop app.
- In the default view, add the ‘Remaining Work’ column and make sure all remaining work is set to 0 hours.
- Click the ‘Gantt Chart’ button at the top-left and select the ‘Resource Sheet’ view.
- Add the ‘Booking Type’ field if required and change all values to ‘Proposed’ which will release the related resource allocations.
- Change to the ‘Gantt Chart’ view and add the ‘Publish’ column to the view.
- Set all cells in the Publish Column to ‘No’ which will unpublish tasks from the resources timesheets.
- Click File at the top left of Project and select ‘Edit Custom Field Values’ on the right-hand side.

- Set the Project Status to Completed and then save and publish the project.
