This is something I’ve been tinkering with for a while now, some method of categorising contacts, accounts and the likes. In my search for the best out of the box way to do this I came across this quite nice solution that just works. It uses custom entities and a sub-grid with no coding required, unlike some of the JavaScript solutions out there that may break after any update.
First we need to set up our custom entity and then we’ll set up a N:N relationship between the Contacts and our entity followed by displaying it all on the contacts form.
Setting up the Custom Entity
- First you need to go to ‘Settings’ and then Customization’.
- Click ‘Customize the System’ and a window will appear.
- Now select ‘Entities’ by clicking it in the left-hand menu.
- Create a new entity by clicking ‘New’ above the list of entities.
- Now I’ll use the example name Categories but you’re welcome to use whatever name works best for you, fill in all the fields as shown in the image below. (If you can’t see it then click the image for a larger version)
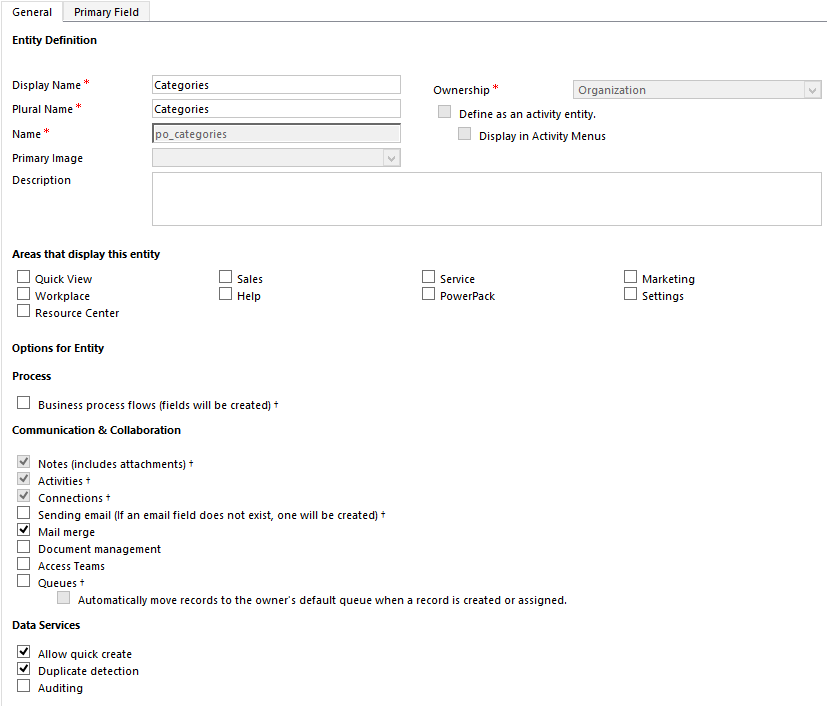
6. Now click ‘Save and Close’ at the top left of the window to create the entity.
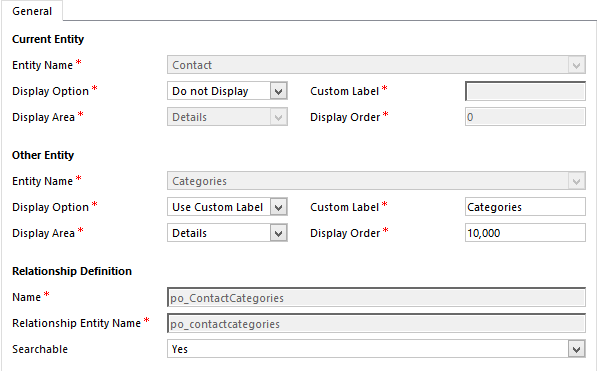
7. In the left-hand menu of the ‘Customize the System’ window find the entity you wish to link to your new categories entity, this is the entity that will display the categories in the end so in this case I’ll use Contacts as an example.
8. Select ‘N:N Relationship’ once you’re in the right entity, then select ‘New Many-to-Many Relationship’ which will open a new window titled ‘Relationship: New’.
9. Under the Current Entity section it should show the entity you’ve just created the new relationship from, under Other Entity select the new categories entity you’ve just created and then give the relationship a descriptive name, once done click Save and you should end up with something similar to below.
10. Close this then you want to go to the Forms section of whichever entity you’re adding this to, find the form that you generally use and then click the name to open the form editor.
11. Select the area you want to add the categories sub-grid then open the Insert ribbon at the top-left of the window. Click Sub-Grid to add a sub-grid to wherever was selected, if you make a mistake just click the sub-grid once then drag it to where you want it.
12. Double click the sub-grid to access the settings of it then you want to set it up as your see below, replacing anywhere it says Categories with the name you called your entity. Set it up as you see in the image below.
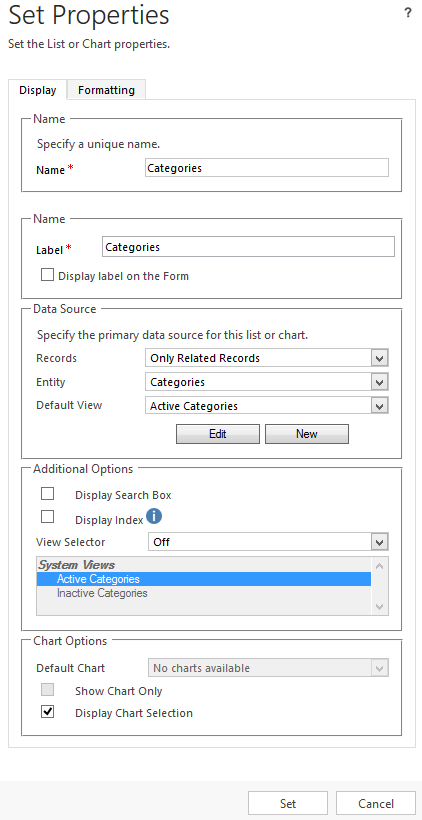
13. once done click Set which will close the window then click Save and Close in the Home ribbon of the form editor window.
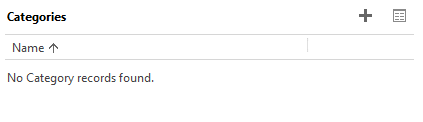
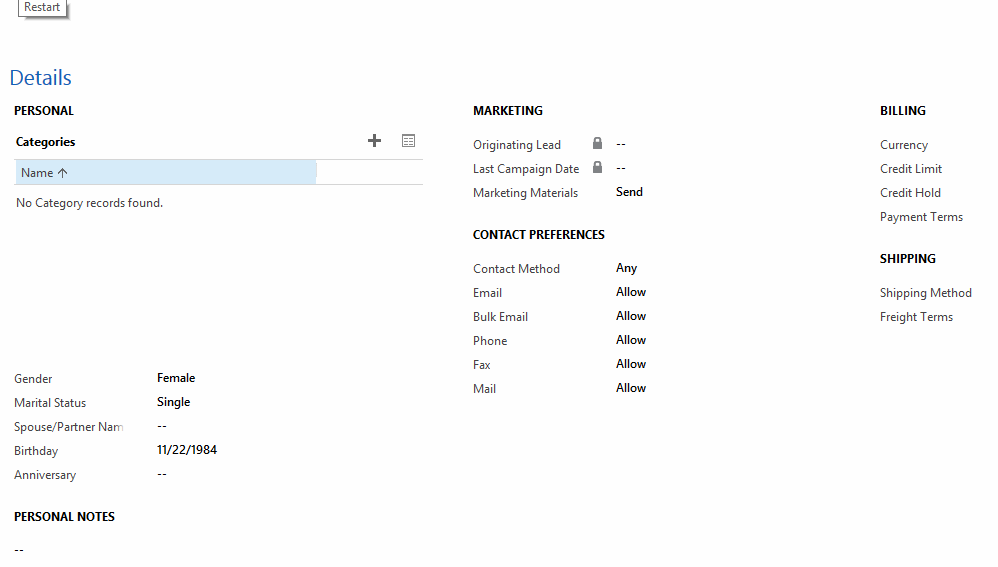
14. You should have the Solution window open now, hit ‘Publish All Customizations’ then close the window and go to whichever entity you’ve just modified, you should see your new sub-grid on the page now which will look similar to the image below.
Creating New Categories/Tags
Adding Values
There are a few ways of going about adding values, you could click the plus symbol then the search symbol which will bring up a pop-up with an option to create new categories or you could do my preference of creating a Quick Create form then adding them from there, I’ll talk about both quickly.
‘+’ Method
1. Clicking the + symbol at the top right will display a search bar to search for categories/tags similar to below.

2. Then click the search icon on the right which will bring up all results, click the ‘+ New’ button you can see in the image below which will by default bring up the Categories form to create new categories.

Quick-Create Method
This method is quicker I’d personally say and if you followed this guide so far you’ll already be halfway to implementing this.
1. quickly open up the ‘Customize the System’ window you opened earlier, which can be found in the CRM settings.
2. Find the entity you created earlier, likely named categories or similar, then go to Forms.
3. Click ‘New’ at the top-left and select ‘Quick-Create Form’.
4. Now modify it to your liking, personally I removed Status Reason (an automatically created field) and renamed the Name field to Category, once done click Save and Close.
5. Click Publish all Customizations then close the window, refresh CRM then go back to where you’re displaying the new Sub-Grid.
6. Click the + Create button in the ribbon at the top right of CRM then select Categories or whatever you named your entity.
7. A Quick Create form will open at the top of CRM allowing you to quickly enter new categories.
Searching by Category/Tag Values
You can also do an advanced search by selected values in these sub-grids although it may not be obvious at first.
- Open the Advanced Find window and change Use Saved View: to [New]. Which allows you to search by related entities in this case our categories field.
- Select the filter by drop-down then scroll down the list of options till you get to Related, find your newly created entity name in the list (in my case Categories).
- Now click Select and filter as you would any other type of field.
- You can save these searches and use categories to do all sorts from dynamically creating Marketing Lists to using them as a base for dynamic views.
Selecting Multiple Categories/Tags at Once
They say a picture is worth a thousand words, so rather than describing this which could lead to confusion here’s a gif showing the steps. If it’s too small click on it to view the full size.
If you’ve got any questions at all or you run into issues don’t hesitate to comment on the article and I’ll try to get back to you when I can.

Is there a way to export this information in a report?
LikeLike
I am a newbie to CRM. For me this is a very helpful post. Thank you so much.
LikeLike
This post is actually a fastidious one it helps new internet users,
who are wishing for blogging.
LikeLike
Anybody can run a blog these days, all you need is a general idea and some knowledge of anything.
LikeLike