Today I’ll be demonstrating a simple method to close a case automatically if it remains in a specified Status for a certain length of time. This is particularly useful if you want to close cases if, for example, they haven’t had a reply from a customer within two weeks or similar.
To do this you will require the permissions to create workflows and fields on the case entity.
The Solution
Create the Required Field on Case
- First, we need to create a field called ‘Time Waiting’ which should have the same settings defined in the image below. This field will contain the date that we want to close the case if it’s not been updated.

- Once done, Save and Publish the new field.
Create the Time Waiting Check Workflow
- Go to Processes and create a new Child Process Workflow on the Case entity. This workflow will just calculate whether the ‘Time Waiting’ fields date/time is lower than or equal to the current Execution Time.
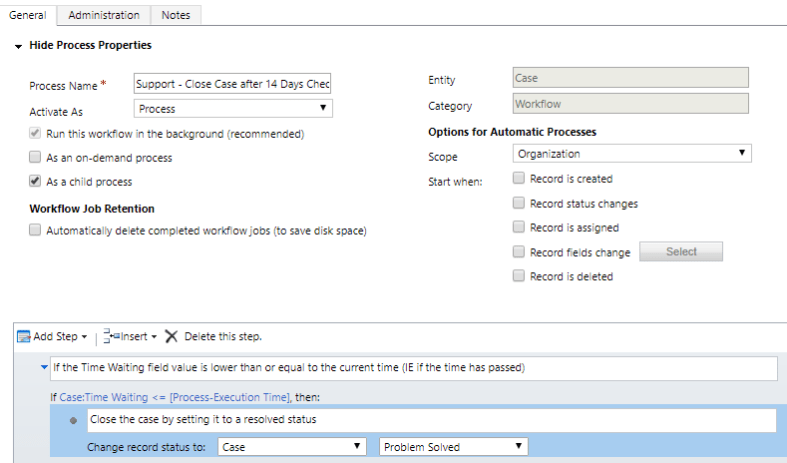
- Ensure that ‘As a child process’ is checked as we’ll run this from a different workflow.
- In order to get the ‘Case:Time Waiting <= [Process-Execution Time]’ check simply click the criteria and select Case – Time Waiting – Is Less Than or Equal To and then in the final field change the ‘Look for’ drop-down to ‘Process’ and then select ‘Execution Time’
- Save and Activate the process so that it will be available from our next workflow.
Create the Trigger Workflow
- Create a new workflow, again on the Case Entity.
- In the ‘Start When’ options check ‘Record fields change’ and then select the ‘Status Reason’ field. This is because we want to trigger the workflow when we’ve set the case to a specific Status Reason.
- Add a ‘Check Condition’ to the workflow logic and set it up as in the following image (you will likely want to change the Status Reason to suit your needs)

- In the workflow, select the If condition you just created and then click ‘Add Step’ and add a ‘Conditional Branch’.
- Set up the condition to be the same as the image below. This conditional branch will contain the logic to reset the Time Waiting field or to clear it entirely depending on the status.

- In this conditional branch add an ‘Update Record’ step and set it to the Case entity.
- Click ‘Set Properties’ and find your ‘Time Waiting’ field in the form, click it and set the Operator to ‘Clear’ so that it will remove the value if a change is detected.
- Save and close this step.
- In the first if statement you now need to add an ‘Update Record’ Step on the Case entity.
- Click ‘Set Properties’, locate the ‘Time Waiting’ field again and set it ahead by however much time you want to wait before closing a case minus 5 minutes or so. For example, if you want to wait 14 days then set it to 13 days, 23 hours and 55 minutes as in the image below. This is because we’ll compare whether this date has passed in order to close the case automatically.

- After this step and within the same if statement add a ‘Wait Condition’.
- Set the condition to Process – Timeout – Equals and change the operator on the right to Duration and set it to the time you’ve chosen to wait. In my case, I’ve set it to 14 days. If you have done this correctly it should show as ‘Timeout until *time* then’ in the workflow window.

- Within the timeout add a ‘Start Child Workflow’ step and set it to the Case entity.
- Do a lookup and link the action to the workflow you created earlier.
- If you’ve followed these instructions you should end up with a workflow similar to the image below.

- Activate the workflow.
Description
From now on whenever a case is set to ‘Awaiting Customer’ in my case, the larger workflow will trigger and set the Time Waiting field to the Execution Time plus the timeout period you set which provides a sort of counter. The workflow will then wait for the duration of the timeout period and will run a workflow which will see if ‘Time Waiting’ has passed.
At any point, if the case is set to any other status then the ‘Time Waiting’ field will be cleared meaning once the workflow finishes it will not close the case.
