This article will go over the initial setup for the ‘Self-Service Customer Portal’ available in Dynamics 365 Cloud. Although, most of the steps will apply to any of the available portal solutions.
I won’t go into detail about the licence requirements or about advanced customization of the portal as that’s a whole other topic in itself, however, if you’d like me to cover that in another article, comment below and request it.
Initial Activation
Before doing anything else we first need to activate the Portals solution, which I’ll cover below.
- To start with log into your Office 365 Admin Portal
- Navigate to ‘Admin Centers’ and then ‘Dynamics 365’.
- Select the Dynamics instance you want to add a portal to, then click the small edit button right of the Solutions heading.

- Select the ‘Dynamics 365 Portals – Customer Self-Service Portal’ solution and then click Install on the right-hand side.
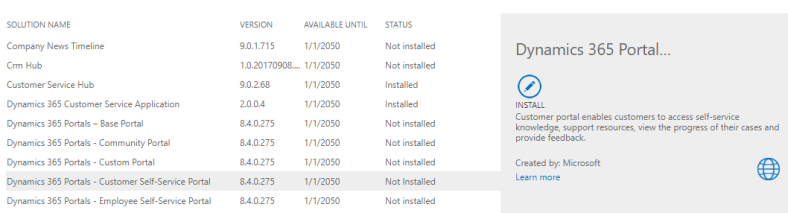
- The status will change to ‘Installing’, this step can take a while. Once done the status will change to ‘Installed’ which means the solution is fully installed in your Dynamics instance.
Initial Setup
Before modifying anything in Dynamics you first need to configure the new Portal application by navigating to the ‘Applications’ tab in the Dynamics 365 Administration Center. This will allow you to configure the address and set up
- Navigate to the Applications tab in the Administration Center.
- Select ‘Portal Add-On’ in the list and click ‘Manage’.
- In the form that appears enter a name for the support desk and the default Portal URL. (You can configure your own URL later).
- Select the instance of Dynamics to link the support desk to then wait a moment for it to process.
- Select the Portal Language and the Portal Administrator (Need to select an existing active user).
- Select the Portal Audience and most importantly the type of portal to deploy.
- At this point, Microsoft will trigger the setup of the Portal. This can take some time (Normally between 5 – 15 minutes).
- Once setup is complete you will see a few new options become available on the Portal settings page as below –

Administrator Setup
You will also have to set up at least one Administrator account to login to the support desk.
- Locate the contact that would have been created by the Portal, this should contain the same email as the user account you selected to be the Portal Admin in the setup.
- Change the form view to ‘Contact: Portal Contact’.
- Scroll down to the Details tab and locate the Web Roles section.
- Click the ‘+’ symbol at the top right of the form and add the ‘Administrator’ role to the user.
- Scroll down to the Web Authentication tab and in the Local Identity section you can set the following (suggested) values –
- Username – Enter a username to use in the support desk.
- Email Confirmed – Set to yes to avoid any email confirmation.
- Login Enabled – Set to yes to enable logging in.
- Once done click ‘Change Password’ in the command bar at the top and enter a new password to enable login.
I hope this was helpful if you’ve any questions do comment below.
